Although many people still disagree over how it is supposed to be pronounced, the gif is undeniably a key element of modern media, with its ubiquitous use across the Internet. While the gif has permeated social media, there are few places online with such a vibrant community of grassroots gif creators as Tumblr. A quick review of Tumblr gif sets shows that most creators use Adobe Photoshop to create gifs, but one need not pay up and subscribe to Adobe Creative Cloud to make animated gifs.
Enter FFmpeg. FFmpeg is a free and open source suite of command line tools for processing audio and video files. In the developers’ words: “FFmpeg is the leading multimedia framework, able to decode, encode, transcode, mux, demux, stream, filter and play pretty much anything that humans and machines have created. It supports the most obscure ancient formats up to the cutting edge.”
So, are you ready to get into the world of gif creation? First off, download and install FFmpeg from here.
Once FFmpeg has been installed, you can immediately try to convert any video from any format to a gif, with just a single line on the terminal/ command prompt:
ffmpeg -ss 2 -t 4 -i input.mp4 -filter_complex "scale=320:-1" output.gifLet’s break down those that command and its arguments:
- ffmpeg - This calls the FFmpeg program.
- -ss - This is the start time for video conversion, where -ss 2 stands for 2 seconds.
- -t - This is the duration of video conversion. -t 4 means that FFmpeg will convert 4 seconds of the video. Together with -ss 2, this means that FFmpeg will only convert frames from the 2 seconds into the video to 4 seconds later or 6 seconds from the beginning.
- -i - This points FFmpeg to the input video for conversion.
- -filter_complex “scale=320:-1” - The -filter_complex argument allows users to specify filters. In this case, the scale filter resizes the image to 320 width while keeping the aspect ratio (the -1 length value).
- output.gif - The output filename is given at the end of the command.
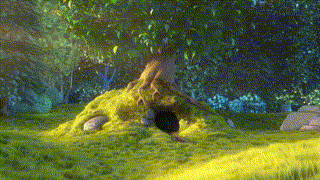
Running this command on a video can give us this image:

So far so good, but the quality could improve.
One of the main drivers of gif quality is its color palette. Thanks to the work of some FFmpeg developers, namely ubitux, FFmpeg includes both a function to define a color palette based on a video and a function to encode a video using a specified color palette. We can use these functions to make a better quality gif by extracting a custom color palatte and using that to encode the gif.
Back to the command prompt:
ffmpeg -ss 2 -t 4 -i input.mp4 -filter_complex "[0:v] palettegen" palette.png
ffmpeg -ss 2 -t 4 -i input.mp4 -i palette.png -filter_complex "[0:v][1:v] paletteuse, scale=320:-1" output.gif
The first line above uses the palettegen filter to generate a 256 color palette to be used in GIF encoding in the next step.
The second line contains two -i arguments, the source video (input.mp4) and the color palette generated from the first line (palette.png). The -filter_complex argument uses the palatteuse filter to apply the color palatte to the source video through downsampling.
Running the code above generates the following image: